Net Inspector can automatically perform certain actions when events/alarms occur. Actions are primarily used for notifying network operators about events, e.g., by e-mail or by running a command that notifies responsible persons via some other means (e.g., by emitting an audible alarm, sending an instant message, SMS, etc.). In this context, actions are commonly referred to as "notifications" or "notification operations" in Net Inspector.
Two types of notifications are supported:
E-Mail notification (Mail)
Connects to the specified SMTP mail server and sends e-mail messages containing event descriptions to the specified recipients.
Command notification (CMD)
Executes a command (program or script) and optionally passes desired event attributes as command line arguments to it. This type of notification can be used to perform arbitrary functions (e.g., notify users about alarms, log events in a file or server, fix network problems in an automated manner, etc.).
This topic describes how to configure and manage notifications in Net Inspector.
Note 1: Only users with administrator access rights are permitted to configure settings described in this topic.
Note 2: Notifications are performed on events. This means that for an alarm, two or more actions will be carried out by the notification operation - when the event that raises a particular alarm occurs, and when the event that clears this alarm occurs. In addition, actions are carried out also when users manage alarms (acknowledge, unacknowledge, manually clear, manually unclear), as this also triggers events.
Note 3: It is important to note that notifications function globally, i.e., they perform actions for all devices monitored by Net Inspector, irrespective of the current user view. By configuring and applying notification filters, one can restrict the notification execution in various ways. For example, an administrator can setup a filter that will allow running commands only for events associated with particular devices or only for events of a particular severity level, etc.
Note 4: Every notification operation (Mail or CMD) must have a notification filter assigned. Notification filters are managed in the Notification Filters dialog box and can be applied to notifications in the New Mail/CMD Notification dialog box, as described in this section.
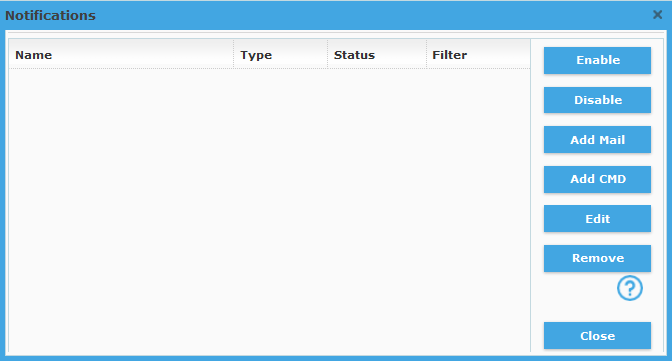
Select the Settings / Notifications command to open the Notifications dialog box (as shown in the image below).
Figure: Notifications dialog box (empty)

The Notifications dialog box is used for managing Mail and Command notifications.
To create a new Mail notification, click the Add Mail button in the Notification dialog box. This opens the New Mail Notification dialog box (as shown in the figure below).
To create a new Command notification, click the Add CMD button in the Notification dialog box. This opens the New CMD Notification dialog box (as shown in the figure below).
To edit an existing notification, select it in the Notifications dialog box and click the Edit button. This opens the Edit Mail/CMD Notification dialog box, which has the same appearance as the New Mail/CMD Notification dialog box.
To enable or disable a notification, select the notification in the Notifications dialog box and click the Enable or Disable button, respectively. A notification must be enabled to perform the configured function (send e-mails or execute commands).
To delete an existing notification, select it in the Notifications dialog box and click the Remove button.
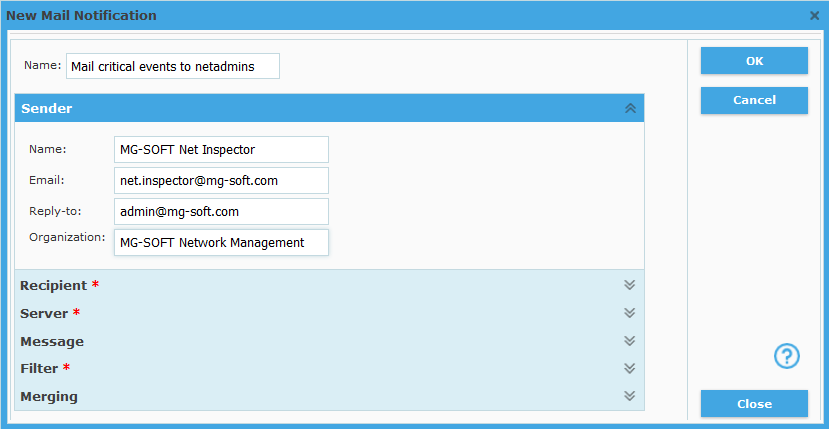
In the Notifications dialog box, click the Add Mail or select an existing mail notification and click Edit button, to open the New/Edit Mail Notification dialog box (shown below).
Figure: New/Edit Mail Notification dialog box, Sender settings
The New/Edit
Mail Notification dialog
box contains several sections of settings, like the Sender,
Recipient, Server, Message, etc. The sections that contain required
settings are marked with a red asterisk (![]() ). The
Sender section is displayed by default. To display
other section, click the down arrows (
). The
Sender section is displayed by default. To display
other section, click the down arrows ( ) of the
respective section. To hide a section, click the up arrows (
 ).
).
In this dialog box, you can specify the following settings:
Name (input line)
The name of the mail notification operation. This is a label under which all the settings in this dialog box are saved.
In the Sender section, specify the information about the e-mail sender, as follows:
Name (input line)
Specifies the name of the e-mail sender (e.g., the name of the e-mail account holder).
E-mail (input line)
Specifies the sender’s e-mail address.
Reply-to (input line)
Specifies the reply-to e-mail address.
Organization (input line)
Specifies the name of the sender’s organization.
Figure: New/Edit Mail Notification dialog box, Recipient settings
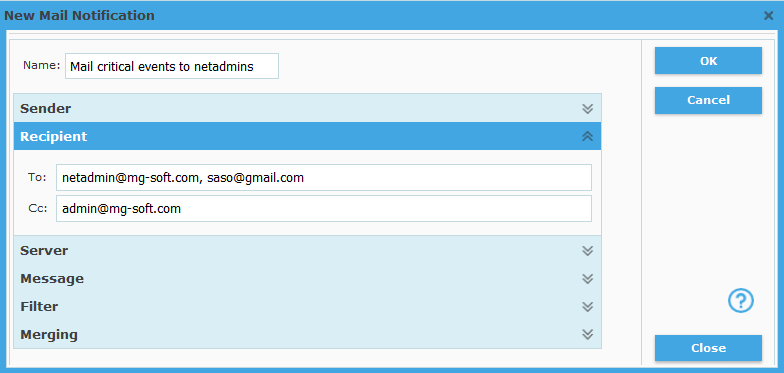
In the Recipient section, specify the information about the e-mail recipient(s), as follows:
To (input line)
Specifies the e-mail address of the recipient of alarm notification e-mails. More than one e-mail address can be specified, where addresses are separated with a comma.
Cc (input line)
Specifies the e-mail address of the recipient of the copy of alarm notification e-mails. More than one e-mail address can be specified, where addresses are separated with a comma.
Figure: New/Edit Mail Notification dialog box, Server settings
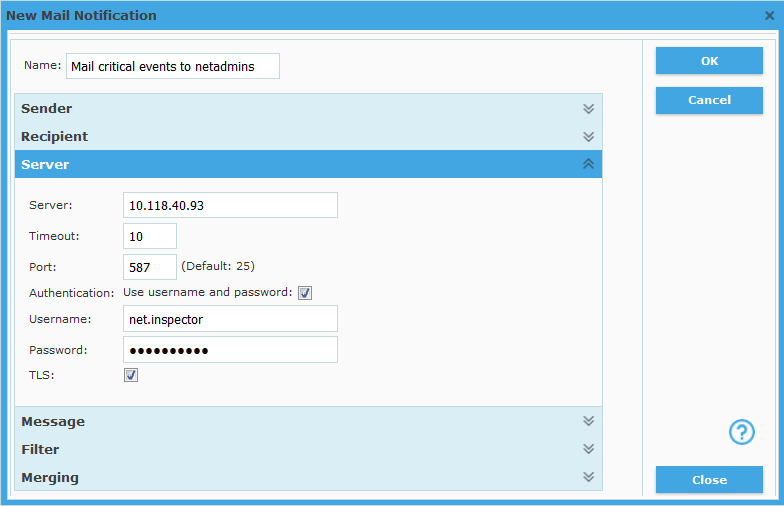
In the Server section, specify the information about the (E)SMTP server that will be sending e-mail notifications, as follows:
Server (input line)
The name or IP address of the (E)SMTP mail server used for sending e-mails.
Timeout (input line)
The timeout value (in seconds) for connecting to the (E)SMTP server.
Port (input line)
The TCP port on which the (E)SMTP server listens to for incoming connections (the default SMTP port number is 25. For secure SMTP connections over SSL or TLS, the default port numbers are 465 and 587, respectively).
Authentication: Use name and password (checkbox)
If this checkbox is checked, the AUTH LOGIN SMTP authentication mechanism is enabled and you should specify the corresponding username and password in the input lines below. You should enable this option only if the (E)SMTP server specified in the Server input line above supports the AUTH LOGIN authentication mechanism.
Username
The username for AUTH LOGIN authentication at (E)SMTP server.
Password
The password for AUTH LOGIN authentication at (E)SMTP server.
TLS (checkbox)
If this checkbox is checked, the TLS transport protocol is used for securing the communication with the (E)SMTP server. You should enable this option only if the (E)SMTP server specified in the Server input line above supports it.
Note: If this option is disabled (Linux version), please refer to the TROUBLE_SHOOTING.TXT document that installs with the software for instructions on how to enable it.
Figure: New/Edit Mail Notification dialog box, Message settings
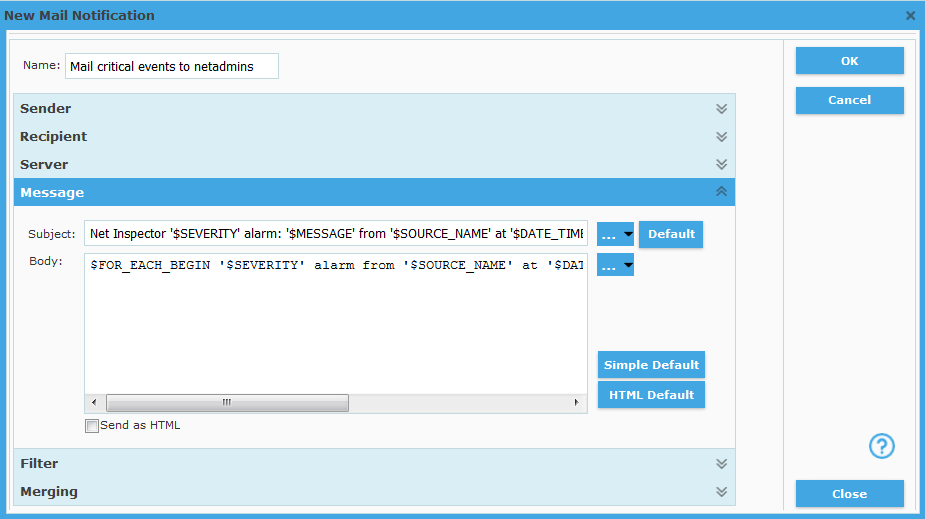
In the Message section, specify the contents of the e-mail message subject and body sections, as follows:
Subject (input line)
Lets you specify the contents of the e-mail subject section by combining arbitrary text with reserved words, which let you include desired information about events/alarms into the e-mail subject. All reserved words start with the “$” character (e.g., $SEVERITY). The reserved words are replaced with the actual event/alarm attributes before the e-mail is sent, e.g., the “$SEVERITY” reserved word is replaced with the severity level of the event (e.g., “Critical”). To view all available reserved words click the Browse (…) button next to the Subject input line to open the Reserved Words dialog box, listing available reserved words and their description. To add a reserved word to the Subject input line, select it in the Reserved Words list and click the Insert button. You can combine regular text with reserved words (e.g., “Event severity level: $SEVERITY”).
To use the default e-mail subject, click the Default button next to the Subject input line.
Body (input area)
Lets you specify the contents of the e-mail message body section.
You can specify the contents of the e-mail body section by combining arbitrary text with reserved words, which let you include desired information about events/alarms into the e-mail body. To view all available reserved words click the Browse (…) button next to the Body input area to open the Reserved Words dialog box, which lists available reserved words and their description. To add a reserved word to the e-mail body, select it in the Reserved Words list and click the Insert button.
To use the default e-mail body in plain text format, click the Simple Default button next to the Body input line.
To use the default e-mail body in HTML format, click the HTML Default button next to the Body input line.
Send as HTML (checkbox)
Enables or disables sending e-mails in HTML format.
Figure: New/Edit Mail Notification dialog box, Filter settings
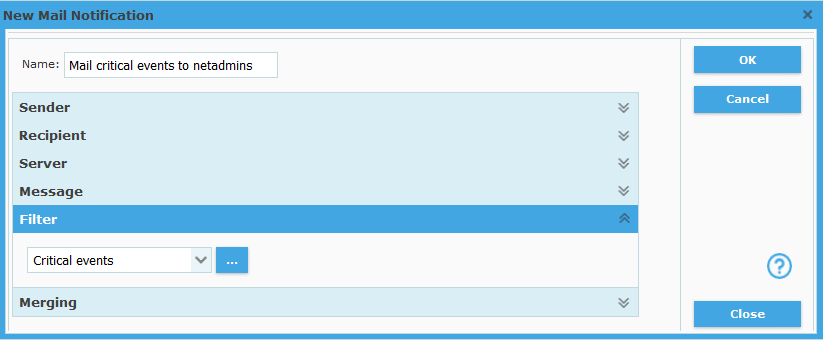
In the Filter section, specify a filter to be used for filtering notifications, as follows:
Filter (drop-down list)
Specifies the notification filter to be used for filtering e-mail notifications. A filter must be used. If no notification filters are configured, click Browse (…) button next to the Filter drop-down list to open the Notification Filters dialog box and configure a filter that will allow sending e-mails only for those events/alarms that match the filter criteria.
Figure: New/Edit Mail Notification dialog box, Merging settings
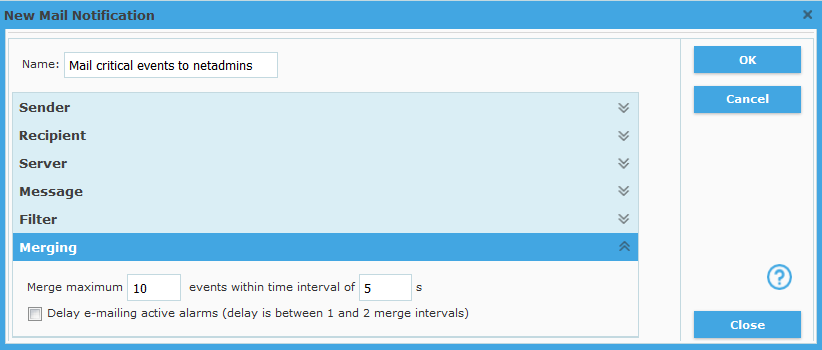
In the Merging section, optionally specify event merging options and e-mail sending delay, as follows:
Merge maximum X events within time interval of Y s
Specifies up to how many events (X) triggered within a specified interval (Y) will be included into one e-mail message. This option can be useful for reducing the number of e-mail messages sent.
Delay e-mailing active alarms (delay is between 1 and 2 merge intervals)
If this option is enabled, Net Inspector Server checks the age of every alarm-raising event and e-mails it only if it is older than the merge interval (Y) set above and if no corresponding clear event exists (meaning the alarm is still active). If the alarm-raising event is younger than the merge interval (Y), it will be e-mailed in the next merge interval. If the corresponding event that clears the alarm is triggered in the meanwhile, both raise and clear events are ignored (not e-mailed). This option is used for e-mailing alarms that are active for at least a specific amount of time (between 1 and 2 merge intervals).
After you have configured the Mail notification settings above, click the OK button in the upper-right section of the New/Edit Mail Notification dialog box to close it and save all the changes.
If you have created a new notification, its name appears in the Notifications dialog box and its status is disabled (Unmanaged). Select the notification and click the Enable button in the Notifications dialog box to enable the notification operation (as shown in the image below).
Figure: Enabling a new Mail notification
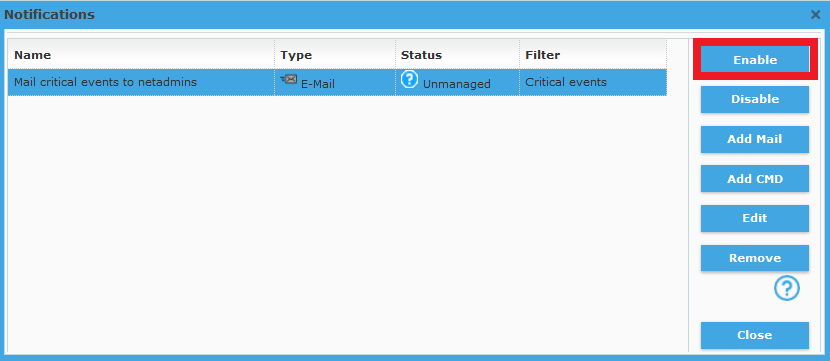
The status of the Mail notification should change to Normal and the software should start sending e-mail notifications to configured recipients when the events/alarms that match the notification filter criteria occur.
Tip: You can create and enable more than one mail notification, e.g., to e-mail different events to different recipients.
In the Notifications dialog box, click the Add CMD or select an existing command notification and click Edit button, to open the New/Edit CMD Notification dialog box (shown below).
Figure: New/Edit CMD Notification dialog box
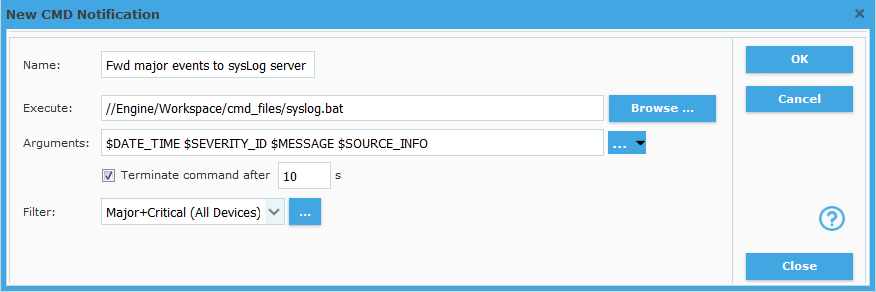
The New/Edit CMD Notification dialog box specify the following settings:
Name (input line)
The name of the command notification operation. This is a label under which all the settings in this dialog box are saved.
Execute (input line)
Lets you specify the system command or the full path to the program or script (e.g., //Engine/Workspace/cmd_files/resetinterface.sh) that will be executed by Net Inspector Server when an event is raised. You can use the Browse (…) button next to this input line to select the executable file from the disk.
Note: The file to be executed must be stored on the computer running Net Inspector Server in the //Engine/Workspace/cmd_files/ folder.
On Windows, this is: C:\ProgramData\MG-SOFT\Net Inspector\Workspace\cmd_files
On Linux, this is: /var/mg-soft/mgnetinspector/workspace/cmd_files
Arguments (input line)
Lets you specify program switches and parameters to be appended to the command specified above. To enable passing desired details about Net Inspector events to the invoked program, use the reserved words. All reserved words start with the “$” character (e.g., $SEVERITY). The reserved words are replaced with the event attributes when the command is executed, e.g., the “$SEVERITY” reserved word is replaced with the severity level of the event (e.g., “Critical”). To view all available reserved words click the Browse (…) button next to the Arguments input line to open the Reserved Words dialog box, listing available reserved words and their descriptions. To add a reserved word to the Arguments input line, select it in the Reserved Words list and click the Insert button. You can also combine regular text with the reserved words (e.g., “-s $SEVERITY”).
Terminate command after X seconds (checkbox and input line)
If this checkbox is checked you can specify how long each command (process) started by this command notification can run, before it will be forcedly terminated by Net Inspector Server (if the process is still running). This option lets you terminate the processes, which do not end by themselves after they have performed the designated action.
Filter (drop-down list)
Specifies the notification filter to be used with the given command notification operation. A filter must be used. If no notification filters exist yet, click the Browse (…) button next to the Filter drop-down list to open the Notification Filters dialog box and configure a filter that will allow executing commands only for those events/alarms that match the filter criteria.
After you have configured the CMD notification settings above, click the OK button in the upper-right section of the New/Edit CMD Notification dialog box to close it and save all the changes.
If you have created a new CMD notification, its name appears in the Notifications dialog box and its status is disabled (Unmanaged). Select the notification and click the Enable button in the Notifications dialog box to enable the notification operation (as shown in the image below).
Figure: Enabling a new CMD operation
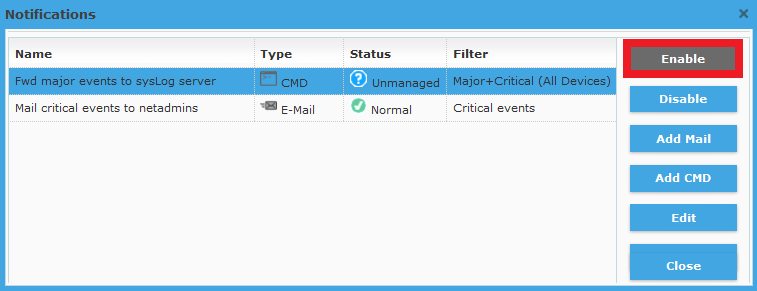
The status of the Command notification should change to Normal and the software will start executing the configured command when the events/alarms occur that match the notification filter criteria.
Tip: You can create and enable more than one CMD notification, e.g., to perform different actions.