Devices can be added to the workspace automatically by means of the network discovery operation. Network discovery operation discovers the devices and topology of your network and automatically adds discovered devices and their connections to Net Inspector configuration and map(s). Net Inspector starts monitoring discovered devices automatically.
Note 1: Only users with administrator access rights are permitted to use the discovery operation and add devices to Net Inspector.
Note 2: Before running the discovery operation, it is recommended to enable SNMP on all switches and routers in your network. This enables discovering the physical network topology.
Discovery operation is a procedure that systematically scans the network for network devices and their (inter)connections by means of ICMP ping and/or SNMP protocol queries.
Net Inspector supports three different network discovery methods:
local - discovers the network (devices and their connections) within the local subnet
range - discovers the network within the specified ranges of IP addresses
progressive - discovers the network by means of the progressive SNMP-based network scan operation. This operation starts by querying one SNMP device and continues by progressively discovering its neighbors and subnets by examining the routing tables and other relevant data on scanned objects.
More than one discovery operation can exist and run simultaneously in Net Inspector (e.g., each discovery operation being performed on a different part of the network, and adding devices to a different user view or map).
Click the Devices tab in Net Inspector header to display the Devices page.
In the upper-right section of the Devices frame, click the Configure button to enter the Configuration Mode.
Figure: Switching into map Configuration Mode
![]()
In the Device Panel, click the Network Discovery tab to switch to the Network Discovery panel.
In
the Network Discovery panel, click the New
Discovery button (![]() )
to open the New Discovery dialog box as shown in the figure below.
Alternatively, to edit an existing discovery operation, select its
name from the Discovery
drop-down list and click the Edit button (
)
to open the New Discovery dialog box as shown in the figure below.
Alternatively, to edit an existing discovery operation, select its
name from the Discovery
drop-down list and click the Edit button (![]() ) in
the Network Discovery panel.
) in
the Network Discovery panel.
Figure: Selecting the New Discovery button in Network Discovery Panel

Into the Name input line in the In the New Discovery dialog box (Figure), enter a name (short description) for the discovery operation.
If you want the discovery operation to run repeatedly, every day at the same time, check the Run discovery every day at checkbox in the Schedule section and enter the corresponding hours and minutes of the day into the accompanying input lines. If this option is enabled in combination with the Automatically add discovered devices option, Net Inspector will automatically add the newly discovered devices in each run to the existing ones.
Figure: New Discovery dialog box
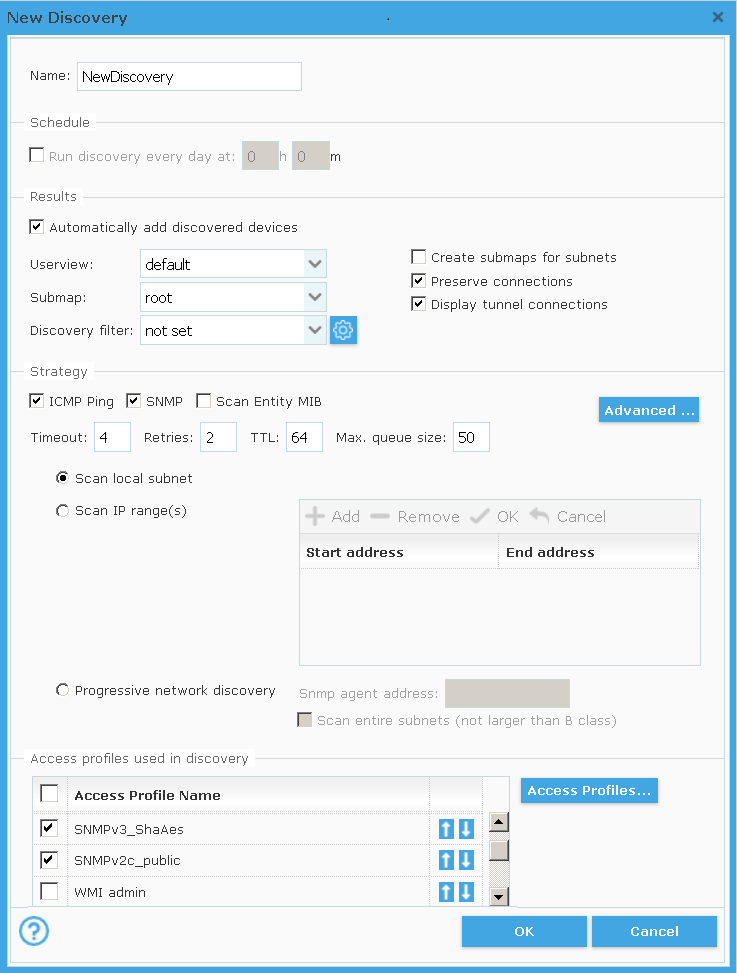
In the Results frame, check the Automatically add discovered devices checkbox. If this option is enabled, Net Inspector automatically adds newly discovered devices to the workspace (i.e., selected user view and map) and to Device Panel, as follows:
User view (drop-down list)
Lets you choose the user view, which the discovered devices will be added to. E.g., select the default entry to add device to the default user view.
Submap (drop-down list)
Lets you select or enter the name of the target submap, i.e., a map, which the discovered devices and their interconnections will be added to. If the specified submap does not exist yet, it will be created. For example, select the root map to add discovered devices to the root map of the selected user view.
Create submaps for subnets (checkbox)
Check this checkbox if you want the Net Inspector to create a submap for each discovered subnet and add corresponding devices to submap(s).
Preserve connections (checkbox)
Check this checkbox if you want the Net Inspector to preserve manually added connections between devices when adding discovered devices and their interconnections to the map. This option is relevant only if the target map already contains (some) devices and connections between them.
Display tunnel connections (checkbox)
Check this checkbox if you want Net Inspector to display also the discovered tunnel connections between managed objects.
Discovery filter (drop-down list)
Lets you select a discovery filter in order to discover only those devices that match the filter conditions. For instructions on configuring discovery filters, please refer to the Configuring Network Discovery Filters topic. Select the not set option to not use any filter.
In the Strategy frame, specify the preferred discovery strategy, as follows:
ICMP Ping (checkbox)
Check this checkbox to enable using ICMP Ping queries for discovering the network devices.
SNMP (checkbox)
Check this checkbox to enable using SNMP queries for discovering the network devices and their interconnections.
Scan ENTITY-MIB (checkbox)
If this checkbox is checked, Net Inspector scans the ENTITY-MIB on discovered devices via SNMP protocol and creates a managed object for each discovered entity. If this checkbox is not checked, entities are ignored and a single managed object is created for each discovered device.
Advanced (toggle button)
Click this button to display and configure the Advanced Discovery Settings, as follows:
Timeout (input line)
Sets the timeout interval in seconds for ICMP ping and SNMP requests.
Retries (input line)
Sets the retries count, i.e., the number of times the ICMP ping and SNMP requests will be retransmitted after the first timeout occurs.
TTL (input line)
Sets the time-to-live parameter that limits the lifetime of discovery packets to the specified number of hops (number of routers over which the discovery packets will be passed. This parameter is important for limiting the depth of the Progressive network discovery operation.
Max queue size (input line)
Specifies the maximum number of concurrent SNMP queries. By using this parameter, you can control the CPU usage and the speed of discovery. By increasing this number, the CPU load and speed will increase and vice-versa.
Scan local subnet (radio button)
If this option is selected, Net Inspector discovers the network (devices and their connections) within the local subnet, i.e., subnet the computer running Net Inspector Server is a member of.
Scan IP range(s) (radio button and accompanying list)
If this option is selected, Net Inspector discovers performs the discovery operation within the specified IP range(s). To add the desired IP ranges use the following controls.
Add (![]() button)
button)
Click this button to add an IP Range to the IP Range list, where you can specify the IP range into the following input lines:
Start address (input line)
The first address of the IP range.
Stop address (input line)
The last address of the IP range.
Remove ( button)
Removes the selected range from the list.
OK
( button)
Accepts the changes and finishes editing the IP range.
Cancel
( button)
Rejects the changes and finishes editing the IP range.
Progressive network discovery (radio button)
The Progressive network discovery starts by querying a single SNMP device and progressively discovers its neighbors and subnets by examining the routing tables and other relevant data on scanned objects. When this option is selected, you have to enter the IP address of the SNMP device to be scanned first.
SNMP agent address (input line)
The IP address of the SNMP-enabled device that will be scanned first.
Scan entire subnets (not larger than B class) (checkbox)
If this checkbox is checked and Net Inspector finds a device (during discovery), whose network mask is larger than traditional class C network mask but does not exceed the size of class B mask, it will scan also the entire subnet, which the discovered device is a member of (this can be time consuming). Note that Net Inspector will always scan entire C-class subnets it discovers, however, it will not scan entire subnets that are larger than B-class.
In the Access
profiles used in discovery list,
specify the access profiles to be used for discovering the network.
Each access profile can contain different settings for accessing network
devices via the SNMP protocol (WMI and VMware settings in access profiles
are not used in discovery). One can create additional access profiles
or edit existing ones by clicking the accompanying Access Profiles button and manage profiles
in the Access Profiles dialog box. The
list of access profiles also determines the order in which they will
be used for discovering network devices (first, the top-listed profile
will be used, then the second profile from the top will be used, etc.).
Every device will be automatically assigned that access profile
with which is has been discovered.
To manage the list of access profiles for discovery, proceed as follows:
To use all existing access profiles, check the topmost checkbox in the header of the access profiles list. This will select all access profiles.
To use specific access profiles, check the checkboxes in front of their names.
To create a new access profile, click the Access Profiles button and click the Add button in the Access Profiles dialog box.
To edit an existing access profile, click the Access Profiles button, select the profile in the Access Profiles dialog box and click the Edit button.
To change the order of an access profile,
click its Up
arrow ( )
to move the profile up on the list or Down
arrow (
)
to move the profile up on the list or Down
arrow ( )
to move the profile down on the list.
)
to move the profile down on the list.
After specifying all the discovery parameters, click the OK button at the bottom of the New/Edit Discovery dialog box to close it and add the newly configured discovery operation to the Discovery Panel (Discovery drop-down list).
In the Network Discovery panel, in the Discovery drop-down list, select the discovery operation you wish to run.
Figure: Selecting a discovery operation from the Discovery drop-down list
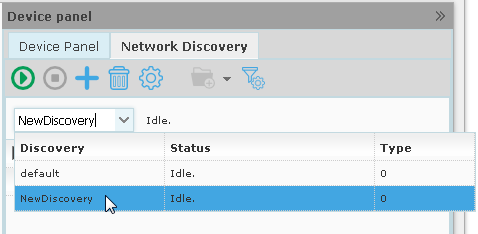
Click
the Start Discovery
button (![]() ) in the Network Discovery
panel's toolbar above the Discovery
drop-down list.
) in the Network Discovery
panel's toolbar above the Discovery
drop-down list.
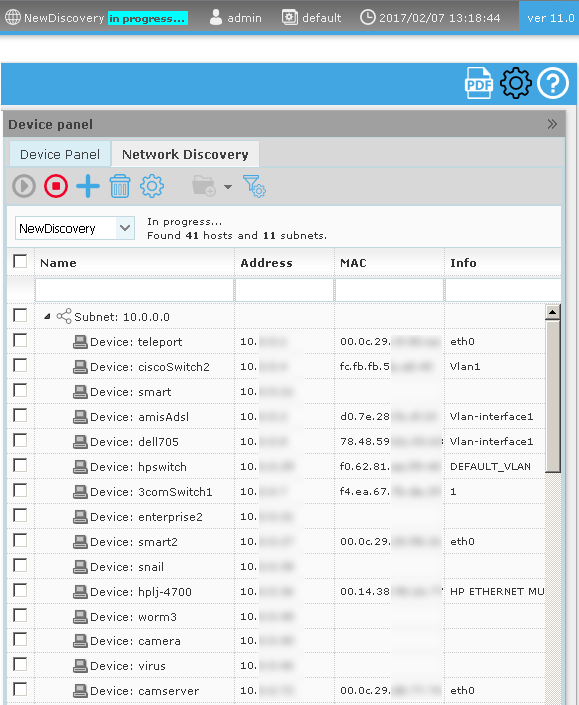
Net Inspector runs the selected discovery operation and starts discovering the network. It gradually displays the results (discovered devices and subnets) in the Network Discovery panel, as shown in the figure below.
Figure: Discovery operation is in progress - discovered devices are being displayed in the Device Panel
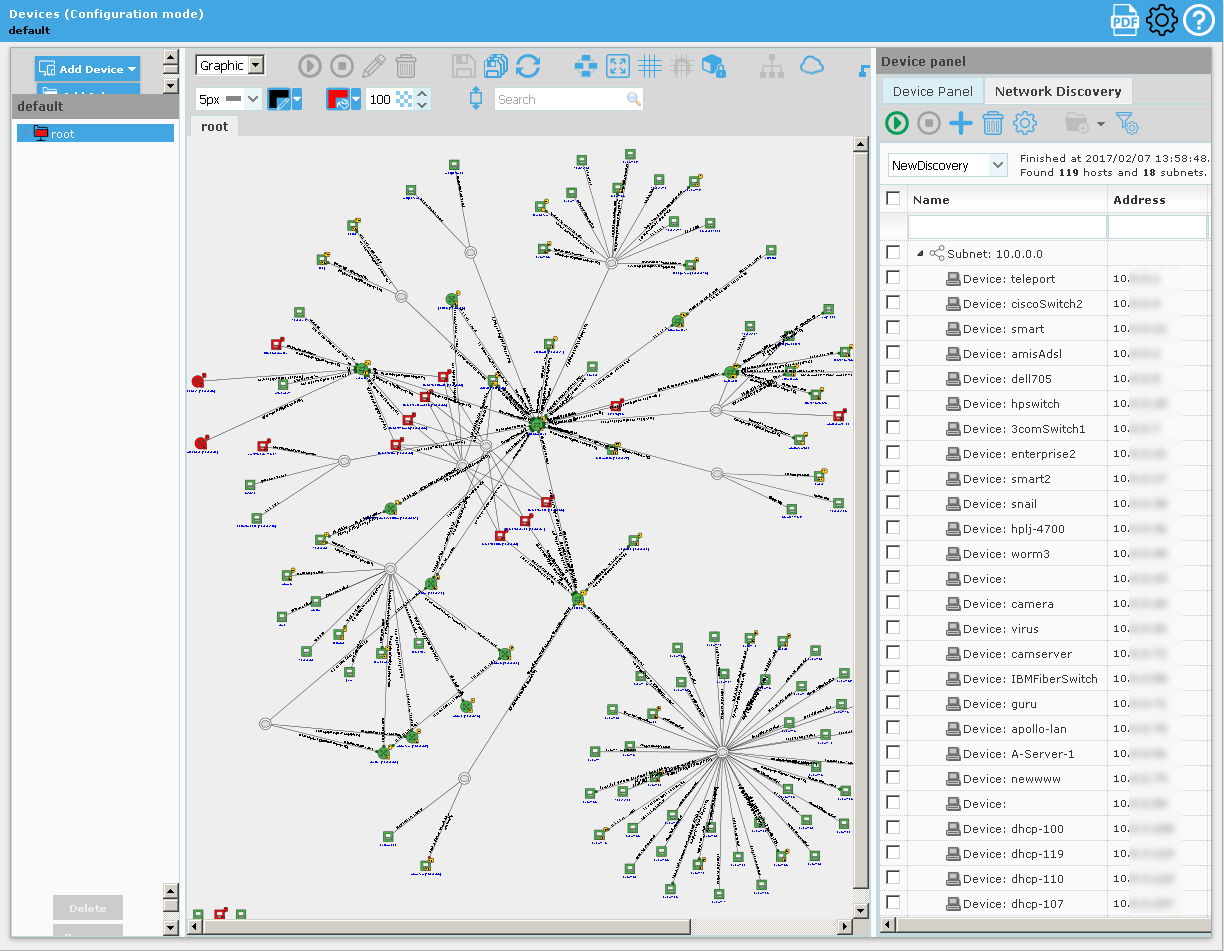
When the discovery operation finishes, the device icons representing discovered devices are automatically added to the workspace (if the Automatically add discovered devices option was enabled in the discovery operation configuration). More specifically, devices are added to the selected user view and map and Net Inspector starts automatically monitoring discovered devices. Device icons are also connected with lines that represent connections between them (Figure).
Figure: Discovery operation is finished - discovered devices and their connections are added to the map
Tip 1: Discovered devices are also automatically added to the Device Panel, from where they can be placed to other maps and user views.
Tip 2: Administrators can edit the layout of the discovered network according to their preferences, e.g., reposition devices, add additional devices, remove devices, manage links between devices, add graphic elements, background images and text to maps, etc.
See Also:
Configuring Network Discovery Filters