The Device Types dialog box is used for viewing and managing the types of devices used in Net Inspector. This dialog box is used also for changing the icons of devices.
The configuration in the Device Types dialog box determines in which type and sub-type categories the devices in Net Inspector fall into and what icons are used for displaying them. Furthermore, this panel lets you define new types of devices based on the built-in (base) types, and sub-types that are variations of base types, meaning that they have the same device type name as the base types (e.g., IP), but different vendor, class and/or icon property.
Once you create a new device type or sub-type, you can add a device of this (sub)type to the Net Inspector workspace.
This topic describes how to view and manage device types in Net Inspector.
Note: Only users with administrator access rights are permitted to configure settings described in this topic.
Every device type has four properties, which uniquely identify it: name, class, vendor and icon.
A sub-type is a variation of a base type, meaning that it has the same type name as the base type (e.g., IP), but different vendor, class and/or icon property.
For example, Net Inspector displays different icons for different classes (router, switch, workstation, printer, etc.) of the IP device type. These are actually sub-types of the IP device type, as follows:
Type name Class Vendor Icon
IP Router blank (=any) X
IP Switch blank (=any) Y
IP Printer blank (=any) Z
Furthermore, we can define different sub-types within a class, e.g., different icons for different vendors of IP routers:
Type name Class Vendor Icon
IP Router Cisco X1
IP Router Juniper X2
IP Router MG-SOFT X3
In cases where two or more sub-type definitions apply, a more specific definition takes precedence over less specific definition(s).
Example:
Type name Class Vendor Icon
IP blank (=any) blank (=any) O
IP Router blank (=any) M
IP Router MG-SOFT N
In the example above, three IP sub-types of different scopes are defined. Line 1 defines the least specific IP (sub)type that covers objects of the broader scope (any class and any vendor). If lines 2 and 3 did not exist, the line 1 would cover all classes and vendors of the IP device type. In such case, Net Inspector would display the icon “O” for all IP objects, regardless of their class and vendor properties. However, as the lines 2 and 3, which are more specific, do exist, they take precedence over the line 1 in cases where the “IP” device type is of class “Router” and vendor is “MG-SOFT”. For example, if we add a new object to the workspace, whose type is “IP”, class is “Router” and vendor is other than “MG-SOFT”, then Net Inspector will display the icon “M” for this object (the sub-type defined in the second line applies). On the other hand, if we create a new object of type “IP”, class “Router” and vendor “MG-SOFT”, then Net Inspector will display the icon “N” for this object (sub-type from the third line).
A new type (also named a derived type) is a device type that is based on one of the built-in types (e.g., IP), but has its own unique name (e.g., NEWIP). New types inherit all the properties of the base types they are derived from. As the built-in types, new types can also be sub-typed, i.e., users can define sub-types of a new type.
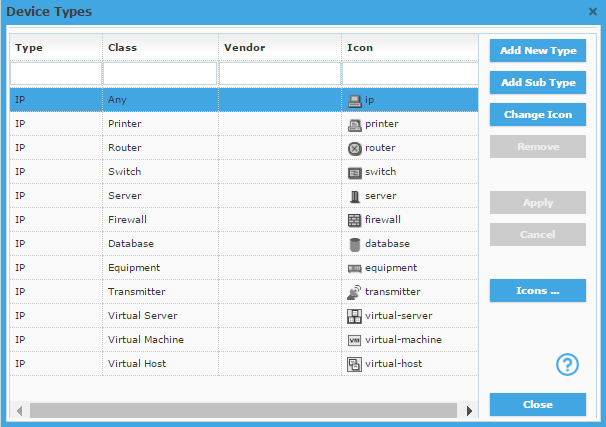
Select the Settings / Device Types command to open the Device Types dialog box (as shown in the image below).
Figure: The Device Types dialog box, listing the built-in device types
The Device Types dialog box is used for managing types of devices used in Net Inspector (creating, editing and deleting device types and sub-types and their icons). Net Inspector has several built-in device types for representing different types of network devices (servers, routers, switches, etc. - see the figure above). These built-in types are actually sub-types of the IP device type. See also the Information Provided by Icons on Maps topic.
Note: The built-in device types cannot be deleted. However, one can change the icons of the built-in types and create new device types and sub-types.
To change the icon of a device type, select the device type and click the Change Icon button in the Device Types dialog box. Select a different icon from the drop-down list in the Icon column. Besides the built-in icons, one can add and use custom icons, as described in the To manage device icons topic below.
To
create a new device type,
click the Add
New Type button. This adds a new line to the Device Types dialog box and lets you configure
it, i.e., enter a new name for the Type
property, and specify the Class,
Vendor and Icon
properties
in the corresponding columns (as shown in the figure below).
When you have specified all the properties of a new device type, click
the Apply
button, to apply the changes and exit the device type edit mode.
For
more information about sub-types and new types, see the About sub-types and new types
topic above.
Figure: Adding a new device type in the Device Types dialog box

To create a new device
sub-type, click the Add
New Type button. This adds a new line to the Device Types dialog box and lets you configure
it, i.e., specify the Type name, Class, Vendor and Icon.
When you have specified
all the properties of a new device sub-type, click the Apply
button, to apply the changes and exit the edit mode.
For
more information about sub-types and new types, see the About
sub-types and new types topic above.
To manage custom icons, click the Icons button in the Device Types dialog box. This opens the Custom Icon Manager dialog box that lets you view and manage user-provided icons.
To delete an user-defined device type or sub-type, select it in the Device Types dialog box and click the Remove button. The built-in device types cannot be deleted.
When you have finished managing device types, click the Close button at the bottom of the Device Types dialog box to close the dialog box.
In the Device Types dialog box, click the Icons button, to open the Custom Icon Manager dialog box (shown below).
Figure: The Custom Icon Manager dialog box (empty)
![]()
Into the Custom Icon Manager dialog box lets you view, add and delete custom (user-provided) device icons, as follows:
To add a custom icon for a device type, you need to provide two icon files:
Small icon - 16x16 pixels in PNG or JPG format. Select the Browse buttons next to the Small Icon and select the small icon image file from disk.
Large icon in SVG (Scalable Vector Graphics) format. Select the Browse buttons next to the Large Icon and select the large icon SVG file from disk.
Click the Upload button to upload both icons to the Net Inspector Server computer. A new line with the uploaded icon appears in the upper section of the Custom Icon Manager dialog box (see the figure below).
Figure: The Custom Icon Manager dialog box (new icon has been uploaded to Net Inspector Server)
![]()
To delete a custom device icon from the server, select it in the upper section of the Custom Icon Manager dialog box and click the Remove button. If the icon is currently in use by some device, it cannot be deleted.
When you have finished managing custom icons, click the Close button at the bottom of the Custom Icon Manager dialog box to close the dialog box.