Net Inspector lets you view the list of built-in alarm types, as well as edit the severity level of some built-in alarm types and add new, user-defined alarm types. This can be done in the Alarm Types dialog box, as described in this topic. The Alarm Types dialog box also lets you view the list of built-in probable causes and event types.
User-defined alarms can be used in trap-to-alarm rules.
Note: Only users with administrator access rights are permitted to configure settings described in this topic.
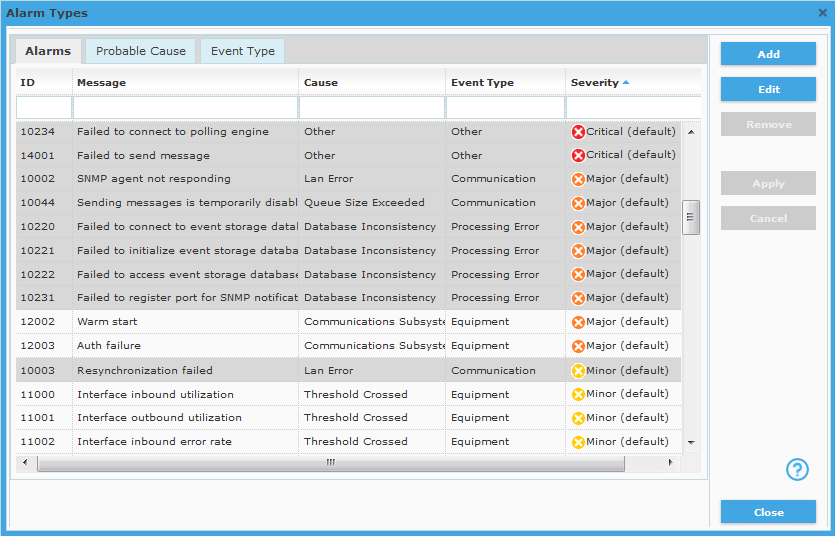
Select the Settings / Alarm Types command to open the Alarm Types dialog box (as shown in the image below).
Figure: Alarm Types dialog box

The Alarm Types dialog box contains 3 tabs: Alarms, Probable Cause and Event Type. The latter two let you view the list of built-in probable causes and event types. The Alarms tab displays the list of alarm types and lets you manage (some of) them. Each alarm type is displayed in one line. The built-in alarm types that cannot be edited, have grey background color, indicating that their editing is disabled. Alarms that can be edited have white background color; these are the built-in alarm types that can be edited and the user-defined alarms. To manage alarm types, proceed as follows:
To create a new alarm type, click the Add button in the Alarm Types dialog box (Alarms tab). This adds a new line to list of alarms and lets you specify the properties of the new alarm (as described below).
To edit the severity level of a built-in alarm type, select it in the Alarms list, click the Edit button to switch the line into edit mode and select a different severity level for the alarm from the Severity drop-down list. Click the Apply button to apply the change.
Note: Not all alarm types can be edited. Only those alarm types that are presented in rows with white background color (see the figure above) can be edited. Only the severity property of editable built-in alarms can be edited.
To delete a user-defined alarm type, select it in the Alarms list, click the Remove button. Only user-defined alarms can be deleted.
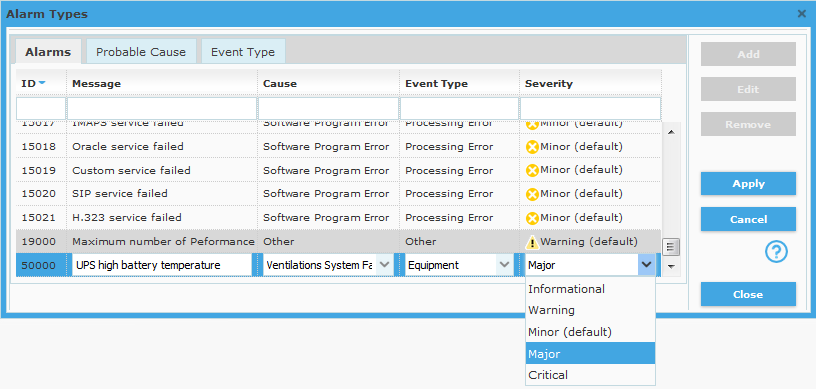
In the Alarm Types dialog box, Alarms tab, click the Add button to add a new line to the alarms list (shown below).
Figure: Creating a new alarm type in the Alarm Types dialog box

The Alarms list now contains a new line in edit mode, so one can specify the properties of the new alarm, as follows:
ID (read-only field)
Displays the automatically assigned identification number (ID) of the alarm.
Message (input line)
Enter the text message that describes the alarm condition.
Cause (drop-down list)
Select the most appropriate probable cause of the alarm from the drop-down list.
Event Type
Select the event type for the alarm from the drop-down list.
Severity
Select the severity level for the alarm from the drop-down list. Severity levels are described in the About Alarms in Net Inspector topic.
After you have configured the properties of the new alarm above, click the Apply button in the right section of the Alarm Types dialog box to save the changes and exit the row edit mode.
Click the Close button in the lower-right section of Alarm Types dialog box to close it.
Tip: Once you have configured a new alarm type, you can assign it to a trap-to-alarm rule in the New/Edit Trap to Alarm dialog box, in the Message drop-down list.