Net Inspector lets you create trap-to-alarm rules that control how enterprise specific SNMP Trap and SNMP Inform notifications sent by network devices map to Net Inspector alarms, as described in this topic.
Note: Only users with administrator access rights are permitted to configure settings described in this topic.
While the software automatically maps the “generic” SNMP notifications (coldStart, warmStart, linkDown, linkUp, etc.) to Net Inspector alarms, the rules for mapping enterprise specific SNMP notifications can be configured manually. This allows you to configure the alarm attributes (alarm message, severity level, alarm source information, etc.) to be displayed by Net Inspector when it receives a particular type of enterprise specific SNMP notification.
Note: If no trap-to-alarm mapping rules are configured, Net Inspector displays the same alarm message and severity level for all alarms based on received enterprise specific SNMP notifications, regardless of the type of notification and importance of the condition reported by the notification. Such alarms have "SNMP notification” alarm message and severity level of “Warning”. To differentiate among such alarms, one needs to inspect the details of the original SNMP notification included in alarms, which can be viewed in the Alarm Details sub-frame, under the “SNMP notification” section.
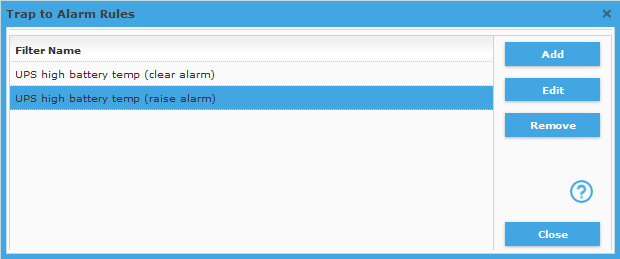
Select the Settings / Trap to Alarm Rules command to open the Trap to Alarm Rules dialog box (shown in the figure below).
Figure: Trap to Alarm Rules dialog box

The Trap to Alarm Rules dialog box is used for configuring trap-to-alarm mapping rules, as follows:
To create a new trap-to-alarm rule, click the Add button in the Trap to Alarm Rules dialog box. This opens the New Trap to Alarm Rule dialog box (as shown in the figure below).
To edit an existing trap-to-alarm rule, select it in the Trap to Alarm Rules dialog box and click the Edit button. This opens the Edit Trap to Alarm Rule dialog box, which has the same appearance as the New Trap to Alarm Rule dialog box.
To delete an existing trap-to-alarm rule, select it in the Trap to Alarm Rules dialog box, click the Remove button.
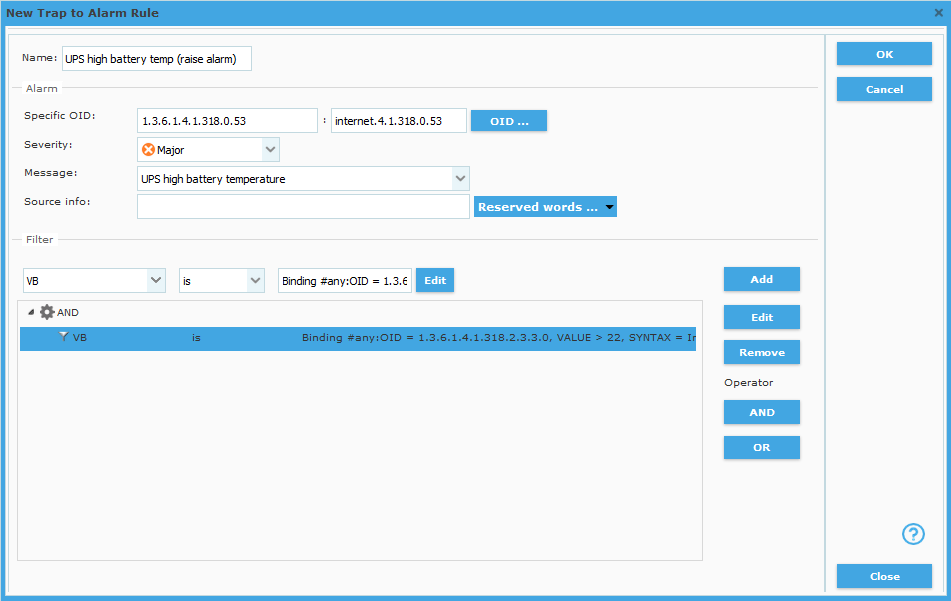
In the Trap to Alarm Rules dialog box, click the Add or Edit button, to open the New/Edit Trap to Alarm Rule dialog box (shown below).
Figure: New/Edit Trap to Alarm Rule dialog box

The New/Edit Trap to Alarm Rule dialog box specify the following settings:
Name (input line)
The name of the trap-to-alarm rule. It is recommended that you give a meaningful name to each rule (e.g., it should denote which alarm it applies to, whether it triggers or clears the alarm, etc.).
Specific OID (two input lines, separated with : )
The first input line contains the OID that identifies the SNMP notification, which the rule applies to. For SNMPv2c and SNMPv3 notifications, this is value of the second variable binding (snmpTrapOID.0) included in the notification PDU. For SNMPv1 Traps, this OID is constructed as follows: <enterprise OID>.0.<specific trap number>, where <enterprise OID> and<specific trap number> are values of the enterprise and specific-trap fields in the SNMPv1 Trap PDU.
The second input line contains the name of the specific OID as it resolves through loaded MIB Modules. For user-friendlier SNMP notification viewing and handling, you should load the private MIB module(s) that define relevant enterprise specific SNMP notifications into Net Inspector.
Note: Specific OID value is the key condition that is checked first in received SNMP notification message. Only if the specific OID value of a received notification matches the one specified in the trap-to-alarm rule, the remaining conditions of the given rule (trap filter) are evaluated (compared to notification attributes).
OID (button)
Opens the MIB Tree dialog box that lets you select the notification’s enterprise specific node/OID from the MIB tree.
Severity (drop-down list)
Lets you select the severity level for the resulting alarm. If the severity level is set to a value other than “Cleared”, the rule will trigger (raise) alarm. If the severity level is set to “Cleared”, the rule will clear the alarm, provided that other conditions for clearing the alarm (trap filter, alarm message, source info) are also met.
Message (drop-down list)
Lets you select a message (description) for the resulting alarm.
Manage Alarms (button)
Opens the Alarm Types dialog box that lets you create user-defined alarms.
Source Info (input line)
Lets you specify the source info property for the resulting alarm. The source info alarm property is used to provide more information about the alarm condition. It can be configured to display one or more attributes of the received SNMP notification (e.g., a value of a variable binding etc.) by entering the “notification” reserved words into this input line (you can combine any text with reserved words). The source info value is optional. However, if specified, it serves as one of the conditions for clearing the alarm, as described in the Alarm Clearing Principle below.
Reserved Words (button)
Opens the Reserved Words drop-down list containing the available “notification” reserved words and their descriptions.
The Filter frame contains the New condition toolbar that lets you create filter conditions and add them to the Filter panel below the New condition toolbar.
New condition (toolbar)
The New condition toolbar lets you create conditions and add them to the trap filter one-by-one, while the central section of the dialog box (Filter panel) displays existing filter conditions and relations between them. The Filter panel displays a trap filter in form of a hierarchical tree, where individual conditions are connected with logical operators (AND, OR).

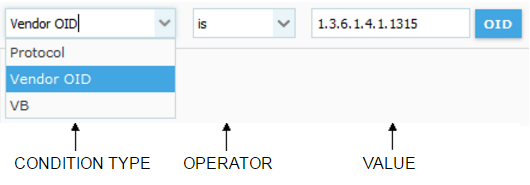
Condition type (drop-down list)
Specifies the type of the condition. You can select among the following types of conditions:
Protocol
Lets you configure a filter condition
that will let through only notifications of particular SNMP protocol
version (i.e., SNMPv1 Traps or SNMPv2c Traps and Informs or SNMPv3
Traps and Informs).
Enterprise
OID:
Lets you configure a filter condition that will let through only SNMP
notifications with a particular enterprise (vendor) OID (specified
in the accompanying input line). If the relevant MIB module is loaded,
click the OID button next to this input line to open
the MIB Tree dialog box and
select the desired object from the graphical MIB tree. The OID of
the selected object will be inserted into the OID input line. This
OID will be compared with the value of the “enterprise” field in the
SNMPv1 trap messages or with the value of the “snmpTrapEnterprise.0”
variable binding included into SNMPv2c and/or SNMPv3 notification
messages.
VB
Lets you configure a filter condition that will let through only SNMP
notifications containing a particular variable
binding. To add a variable binding filter condition, select
the “VB” condition type from the New condition drop-down list. The
variable binding configuration preview and the Edit
button are displayed in the New condition
toolbar:

You need to configure a VB condition before adding it to the filter, as described below.
Note: A variable binding has the following properties:
OID/name, syntax, value and position in the variable bindings list. For example: sysUpTime.0, Timeticks, 2344223, Binding#1. These settings can be configured in the Binding Editor dialog box.
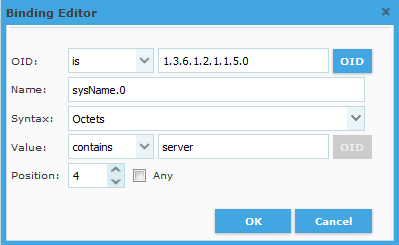
To configure a variable binding, click the Edit button in the New Conditions toolbar. The Binding Editor dialog box opens, providing the following controls:
Figure: Binding Editor dialog box

OID (operator, input line and button)
From the operator drop-down list, select the desired operator (e.g., “is”, “is not” or “contains”) and enter the OID of the name portion of the variable binding into the OID input line. Alternatively, click the OID button next to this input line to open the MIB Tree dialog box and select the desired object from the MIB tree. The OID of the selected MIB object will be inserted into the OID input line. You need to enter the object instance (e.g., .0) manually.
Name
Displays the name of the OID specified above as it resolves through loaded MIB modules. For user-friendlier SNMP notification viewing and handling, you should load the MIB module(s) that define relevant OIDs in the MIB Modules dialog box.
Syntax (drop-down list)
Lets you select the syntax of the OID specified above (e.g., Octets, Counter32, IP address, etc.). Depending on the selected syntax, different Value operators are available below.
Value (operator, input line and OID button)
Lets you specify the variable binding value. From the operator drop-down list, select the desired operator (e.g., “is”, “is not”, “contains”, “greater”, etc.). The list of available operators depends on the syntax selected above. Then, enter the desired value of the variable binding into Value input line. If the “OID” syntax is selected, you can click the OID button next to the Value input line to select the relevant object (and thus its OID) from the MIB Tree dialog box.
Position (input line)
Specifies the position of the variable binding in the variable bindings list included in the notification PDU. For example the number “3” means that this variable binding must be the third binding in the variable bindings list. Note that SNMP specification requires that the first and the second variable binding in all SNMPv2c and SNMPv3 Trap and Inform PDUs be “sysUpTime.0” and “snmpTrapOID.0” respectively (this is not required for SNMPv1 Traps). Therefore, consider this requirement when creating trap-to-alarm rules for notifications transmitted via SNMPv2c or SNMPv3.
Any (checkbox)
If checked, all variable bindings in the received notification PDU are checked for the matching binding. This option can be useful when the position of bindings in Trap PDUs vary or when creating a trap-to-alarm rule to cover SNMPv1 and SNMPv2c/v3 notifications (note that the first binding in a specific SNMPv1 Trap will be the third binding in equivalent SNMPv2c or SNMPv3 Trap).
Note: this option should be disabled if possible, as it may degrade the Net Inspector Server performance.
OK (button)
Applies the changes and closes the Binding Editor dialog box. A preview of the newly configured variable binding is displayed in the New condition toolbar. Click the Add button in the New/Edit Trap-to-Alarm Rules dialog box to add the configured condition to trap filter.
Cancel (button)
Discards the changes and closes the Binding Editor dialog box.
Operator (drop-down list)
Lets you select the condition operator, e.g., “is”.
Value (drop-down list or input line)
Lets you enter or select the condition value. Available (and valid) values depend on the type of the condition selected.
After you have selected the desired entries from the Condition type, Operator, and Value drop-down lists, click the Add button to add the condition to the filter. The added condition will appear in the central section of the dialog box (Filter panel).
Repeat the above steps to add additional conditions to the filter.
To add a logical AND or OR operator to the filter, select the target position for the new operation in the Filter panel and click the AND or OR button in the right-hand side of the New/Edit Trap to Alarm Rule dialog box.
Note: If you add two or more conditions of the same type (e.g., Protocol=SNMPv1 and Protocol=SNMPv2c), these conditions should be combined with the logical OR operator, whereas conditions of different types (e.g., Protocol=SNMPv1l and VendorOID=1.3.6.1.4.1.1315) can be combined with the logical AND or the logical OR operator.
To remove a condition from the filter, select it and click the Remove button.
When you have added all filter conditions to the filter, click the OK button in the upper-right section of the dialog box to create the filter and close the New/Edit Trap to Alarm Rule dialog box. .
The newly configured filter appears in the Trap to Alarm Rules dialog box (as shown in the figure above). Once you create a trap-to-alarm rule, it is automatically applied, meaning that from that moment on Net Inspector will map all newly received SNMP notifications that match the given trap filter to alarms according to the rule. If applicable, you should configure another trap-to-alarm rule that will close the alarm when Net Inspector receives the corresponding SNMP Trap or Inform notification.
Click the Close button in the lower-right section of the Trap to Alarm Rules dialog box to close it.
Whenever applicable, one should create two trap-to-alarm rules for each type of alarm condition (e.g., fault), one that triggers the alarm and the other that clears it. For example, if a device sends an SNMP Trap when the chassis temperature raises above the normal level and another SNMP Trap when the temperature drops back to normal, you should create two-trap-to alarm rules: one that will raise the alarm (e.g., set the alarm severity level to “Crtical”) and the other to clear the alarm (i.e., set its severity level to “Normal”).
Alarm clearing is controlled by the severity, message and source info values (besides the trap filter). More specifically, a trap-to-alarm rule B, which clears the alarm triggered by the trap-to-alarm rule A, must have the same alarm message and source info value as the rule A, and the severity set to “Normal”. Of course, rule B will have a different trap filter than rule A.
Example of two trap-to-alarm mapping rules (without filter) used for triggering and clearing a user-defined alarm
|
This rule triggers (opens) a user-defined alarm |
|
This rule clears (closes) the above user-defined alarm |
Note that when using reserved words (e.g., $VB_VALUE(4)) for the source info value, the reserved words are expanded (replaced with the actual values from a received SNMP notification) and then the expanded source info value is compared to source info values of open alarms (when clearing alarms).