Users can view and manage active alarms, as described in this section.
Tip: To view a web page dedicated to device, which the alarm relates to, click the device name hyperlink in the Device column of the Active Alarms frame.
To Display or Hide Columns and Alarm Details:
To display or hide individual columns in the Active Alarms frame, click the
 column
selector button displayed
in Active Alarms toolbar and check or uncheck the columns you
want to display or hide in the pop-up menu that appears.
To enable viewing additional information about alarms (incl. SNMP Trap details - if alarm originates from an SNMP Trap or Inform message), click the Alarm Details button in the header section (see the image below) to display the Alarm Details sub-frame.
Figure: Expanding the Alarm Details sub-frame

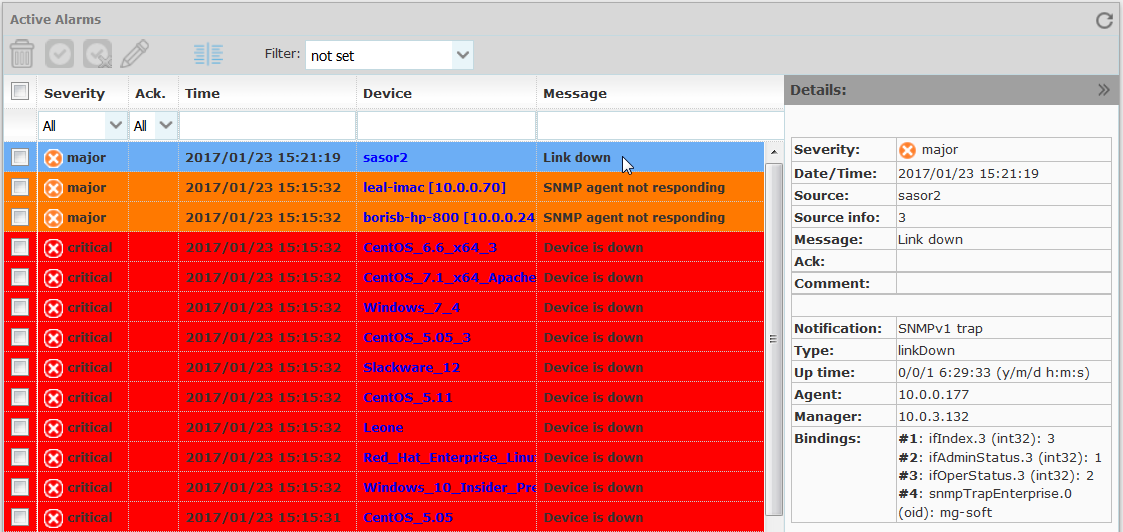
Click an alarm in the Active Alarms list to view its details in the Alarm Details sub-frame (as shown in the figure below).
Figure: Viewing details about an alarm in the Active Alarms frame and Alarm Details sub-frame

To Sort Alarms:
By default, the list of active alarms is sorted chronologically, with most recent alarms displayed at the top of the Active Alarms frame.
To sort the alarms list by a column, click the relevant column header (Severity, Time, Message, etc.). For example, to sort listed alarms by the severity level, click the Severity column header in the Active Alarms frame.
Once you click the column header, the ascending sort symbol (e.g.:
 ) appears in the column header. Click the
column header again to switch to sorting in descending order.
To Filter Alarms:
One can filter alarms by using either quick filters or alarm filters.
Using Quick Filters:
Quick filters are used for quickly finding the alarms of interest.
All columns in the Active Alarms frame have quick filter fields below the header row. These fields let you quickly filter the list of active alarms. Note that quick filters are short-lived, i.e., they are automatically removed when the page/frame is reloaded.
Some quick filter fields (e.g., Severity, Ack.) have a drop-down list with predefined values, while others are filter-as-you-type input fields. You can use two or more quick filter fields to achieve the desired filtering effect (combined filter criteria). Note that the values you specify in quick filter fields are in logical AND relation.
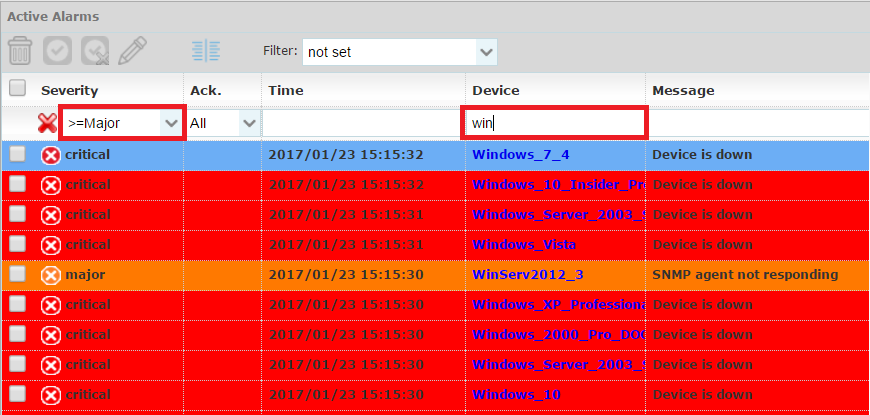
Example: Display only alarms of severity level Major and Critical on devices whose names contain string "win":
From the Severity quick filter drop-down list, select the value >=Major.
Into the Device quick filter input line, enter the phrase win (Figure).
Note: Quick filters are not case sensitive.
Figure: Filtering active alarms by using quick filters
The Active Alarms frame will display only "Major" and "Critical" alarms associated with devices whose names contain the string "win". The number of filtered alarms and the total number of alarms are displayed in the frame status bar.
To remove a quick filter, delete the value from the quick filter input line or click the clear filter (
 ) button in the left section of the quick
filter row.
Note: Quick filters are automatically removed when the page/frame is reloaded.
Using (Regular) Alarm Filters:
Unlike the short-lived quick filters, regular alarm filters are used for permanent filtering, i.e., once applied, an alarm filter remains in effect until manually removed by the user. Furthermore, alarm filters allow you to specify much more complex filtering criteria than quick filters. One can filter alarms by virtually any property or combination of properties and use logical OR and AND operators to connect filter conditions.
Filters are configured in the Alarm Filters dialog box. Once created, alarm filters are available for selection in the Filter drop-down list in the toolbar in the Active Alarms frame and Alarm History frame.
Filters are saved on a per-user basis, i.e., every Net Inspector user creates and uses his/her own set of filters.
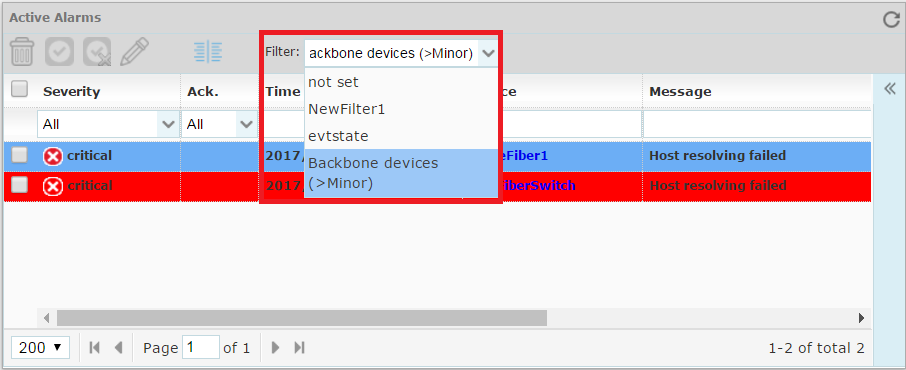
To apply a filter to the Active Alarms frame, select the filter name from the Filter drop-down list in the toolbar in the Active Alarms frame.
Figure: Choosing an alarm filter from the Filter drop-down list

When a filter is applied, the list of active alarms displays only those alarms that match the filter conditions.
The list of filtered alarms dynamically changes over time, i.e., new alarms that match the filter criteria are added to the list, while cleared alarms disappear from the list.
To remove the filter, select the Not set entry from the Filter drop-down list in the toolbar in the Active Alarms frame.
To Acknowledge Alarms:
To acknowledge an alarm, select it by checking its checkbox in the list of alarms and choose the Acknowledge button (
 ) at the top of the Active Alarms frame (Figure). By acknowledging an alarm
you declare that you are aware of the condition reported by the
alarm.
Figure: Acknowledging a selected alarm in Active Alarms frame

A check mark (

 ) appears in the Ack.
column of the Active Alarms frame,
indicating that the alarm is acknowledged. Furthermore, Net Inspector
displays the acknowledgement details in the relevant fields
(Ack./Unack., Ack. Time).,
i.e., the username and IP address of the user who has acknowledged
the alarm and the date and time of the alarm acknowledgement (Figure).
) appears in the Ack.
column of the Active Alarms frame,
indicating that the alarm is acknowledged. Furthermore, Net Inspector
displays the acknowledgement details in the relevant fields
(Ack./Unack., Ack. Time).,
i.e., the username and IP address of the user who has acknowledged
the alarm and the date and time of the alarm acknowledgement (Figure).Figure: Viewing alarm acknowledgement information

To unacknowledge an alarm (e.g., if you think the problem requires additional attention), check its checkbox in the list of alarms and select the Unacknowledge button (
 )
at the top of the Active Alarms frame.
)
at the top of the Active Alarms frame.A check mark disappears from the Ack. field in the Active Alarms frame. Again, Net Inspector records relevant details about this operation and displays them in the relevant fields (Ack./Unack., Ack. Time).
To Comment Alarms:
To add a comment to alarm, select the alarm by checking its checkbox in the list of alarms and choose the Comment button (
 )
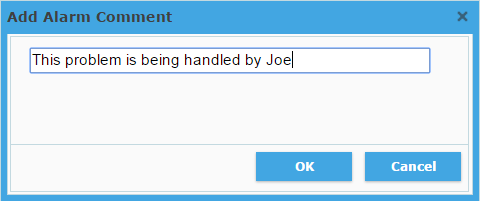
at the top of the Active Alarms frame. Enter a text of your choice
into the Add Alarm Comment dialog box that appears. User comments
are shown in the Comment
column.
Figure: Add Alarm Comment dialog box

Net Inspector automatically prefixes the comment text displayed in the Comment column with the username and the IP address of the user who has added the comment. The date and time of adding the comment is also shown in the Comment Time field.
To Manually Clear Alarms:
To manually clear an alarm, select it by checking its checkbox in the list of alarms and choose the Clear button (
 ) at the top of the Active Alarms frame.
 The cleared alarm disappears from the Active Alarms frame. Cleared alarms can be viewed in the Alarm History frame.
Note: Not all alarms can be manually cleared. Only performance related alarms and user-defined alarms can be manually cleared.
