Net Inspector lets you create a filter to display only those alarms that match the filter conditions. Alarm filters are used in the Active Alarms frame and Alarm History frame.
Note: Alarm filters are used for continuous alarm filtering. Once applied, an alarm filter continuously filters the list of alarms, i.e., new alarms that match the filter criteria are added to the list, while cleared alarms disappear from the list.
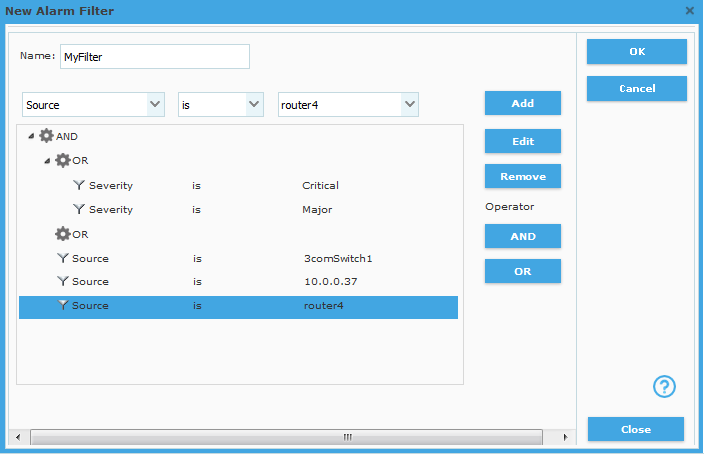
Alarm filters are created in the New Alarm Filter dialog box (Figure), which contains a toolbar that lets you create filter conditions and add them to the filter one-by-one.
![]()
CONDITION TYPE |
OPERATOR |
VALUE |
The new condition toolbar lets you create a filter condition by selecting the condition type, operator and value from the corresponding drop-down lists. Once the condition is configured, you can add it to the filter by clicking the Add button in the right section of the New/Edit Alarm Filter dialog box. The central section of the dialog box (Conditions panel) displays the entire filter consisting of filter conditions and relations between them. The Conditions panel displays a filter in form of a hierarchical tree, where the filter conditions are connected with logical operators (AND, OR).
This topic describes how to configure and manage alarm filters.
To open the Alarm Filters dialog box
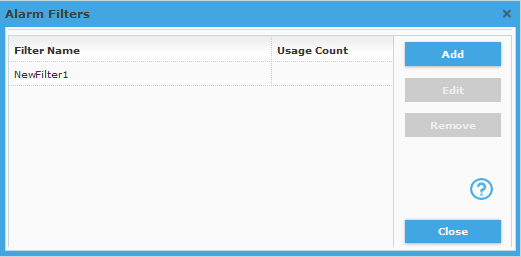
Select the Settings / Alarm Filters command to open the Alarm Filters dialog box (shown in the image below).
Figure: Alarm Filters dialog box

The Alarm Filters dialog box is used for managing alarm filters.
To create a new alarm filter, click the Add button in the Alarm Filters dialog box. This opens the New Alarm Filter dialog box (as shown in the figure below).
To edit an existing filter, select it in the Alarm Filters dialog box and click the Edit button. This opens the Edit Alarm Filter dialog box, which has the same appearance as the New Alarm Filter dialog box.
To delete an existing filter, select it in the Alarm Filters dialog box and click the Remove button.
To create or edit an alarm filter
In the Alarm Filters dialog box, click the Add or Edit button, to open the New/Edit Alarm Filter dialog box (shown below).
Figure: New/Edit Alarm Filter dialog box

Into the Name input line, specify the filter name. This name will be displayed in the Filter drop-down list in the Active Alarms frame and Alarm History frame.
In the New Condition toolbar, select the desired values from the Condition type, Operator, and Value drop-down lists to create a filter condition. You can select among the following types of conditions:
Severity
Specifies the severity level of the alarm. If this condition type is selected, you can choose the alarm severity level from the Value drop-down list (e.g. “Critical”, “Major”, etc.).
Source
Uniquely identifies the device, which has triggered the alarm. If this type of condition is selected, select the source device from the Value drop-down list.
Source name
Specifies the name of the device (as displayed on the workspace), which has triggered the alarm. If this condition type is selected, you can enter the name of the device into the Value input line. Note, however, that two or more objects can have the same name. Use the Source condition type to uniquely specify the source in such case.
Source info
Specifies additional information about the problem (as displayed in the Source Info column in the Active Alarms frame). If this condition type is selected, you can enter additional informational about the object into the Value input line (e.g., “Processor:#1”).
Source type
Specifies the type of the device, which has triggered the alarm. If this condition type is selected, you can choose the device type from the Value drop-down list (e.g. “IP”).
Message
A short description of the alarm. If this condition type and the operator “is” or “is not” is selected, you can choose a message from the list of all messages in the Value drop-down list (e.g. “Device is down”). If this condition type and the operator “contains” is selected, you can enter a text string (e.g., “Dev”) into the Value input line to find all alarms whose message field contains the specified character(s).
Cause
Specifies the cause of the alarm. If this condition type is selected, you can choose a cause from the Value drop-down list (e.g. “Lan Error”).
Event Type
Specifies the type of the event/alarm. If this condition type is selected, you can choose an alarm type from the Value drop-down list (e.g. “Communication”).
Event state
Specifies the state of the alarm. If this condition type is selected, you can choose an event or alarm state from the Value drop-down list (e.g. “ACKNOWLEDGED” or “MANUAL CLEARED” or “AUTO CLEARED”, etc.).
(Un)Acknowledge time
Specifies the date and time of acknowledging or unacknowledging the alarm. If this condition type is selected, you can enter the desired date and time into the Value input line, using the built-in Calendar.
(Un)Clear time
Specifies the date and time of clearing or unclearing the alarm. If this condition type is selected, you can enter the desired date and time into the Value input line, using the built-in Calendar.
Event state info
Specifies who has changed the state of the alarm as last. This can be either a user that has managed the alarm (e.g., acknowledged, unacknowledged, manually cleared) or the “Auto” if the alarm has been automatically cleared by the system. When specifying a user, you can also specify the location (IP address) of the user who has managed the alarm in square brackets (e.g., operator [192.168.10.120]). If this condition type is selected, you can enter an event state info into the Value input line (e.g. “admin [192.168.10.123]” or “Auto”, etc.).
After you have selected the desired entries from the Condition type, Operator, and Value drop-down lists, click the Add button to add the condition to the Filter. The added condition will appear in the central section of the dialog box (Conditions panel).
Repeat steps 4-5 above to add additional conditions to the filter.
To add a logical AND or OR operator to the filter, select the target position for the new operation in the Conditions panel and click the AND or OR button in the right-hand side of the New/Edit Alarm Filter dialog box.
Note: If you add two or more conditions of the same type (e.g., Severity=Critical and Severity=Major), these conditions should be combined with the logical OR operator, whereas conditions of different types (e.g., Severity=Critical and Message=Device is down) can be combined with the logical AND or the logical OR operator.
To remove a condition from the filter, select it and click the Remove button.
When you have added all filter conditions to the filter, click the OK button in the upper-right section of the dialog box to create the filter and close the New/Edit Alarm Filter dialog box. This filter will be available for selection in the Filter drop-down list in the Active Alarms frame and Alarm History frame.
The newly configured filter appears in the Alarm Filters dialog box. Click the Close button in the lower-right section of the dialog box to close it.