A user view is a collection of monitored devices that a user is allowed to view/manage. User views differ in respect to what devices they contain and how those devices are grouped and hierarchically structured. A user view can include either all monitored devices (e.g., an administrator user view), or any subgroup of devices (e.g., user views assigned to users with limited access rights). A device can be included in more than one user view. A user view displays only those alarms, which are associated with included devices. See also About Users, Access Rights and User Views topic and the Configuring Users topic.
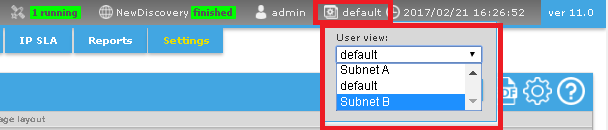
Normally, at least one user view is assigned to each Net Inspector user. If only one user view is assigned to the user, this user view is automatically displayed when the user logs on to Net Inspector. If more than one user view is assigned to a user, the user can select the desired user view when logging on to Net Inspector Server, or later, after the log on (as shown in the last figure).
The complete procedure of creating and configuring a user view includes the following steps:
Creating a new user view and assigning it to one or more users (as described in this topic).
Switching into the new user view (as shown in the last figure),
Adding devices and graphic objects to the new user view and organizing devices into maps and submaps (Map View frame), as described in the Configuring Workspace topic.
This topic describes how to create and manage user views in Net Inspector.
Note: Only users with administrator access rights are permitted to configure settings described in this topic.
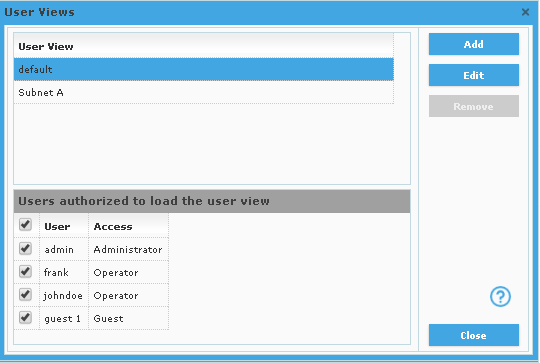
Select the Settings / User Views command to open the User Views dialog box (shown in the image below).
Figure: The User Views dialog box
The User Views dialog box is used for creating and managing user views, as follows.
Note: After installation, a user view with the name default is present in Net Inspector. Administrators can edit this user view and create additional user views.
To create a new user view, click the Add button in the User Views dialog box. This opens the New User View dialog box (as shown in the figure below).
To edit an existing user view, select it in the User Views dialog box and click the Edit button. This opens the Edit User View dialog box, which has the same appearance as the New User View dialog box.
To delete an existing user view, select it in the User Views dialog box and click the Remove button. The default user view cannot be deleted.
In the User Views dialog box, click the Add or Edit button, to open the New/Edit User View dialog box (shown below).
Figure: New/Edit User View dialog box
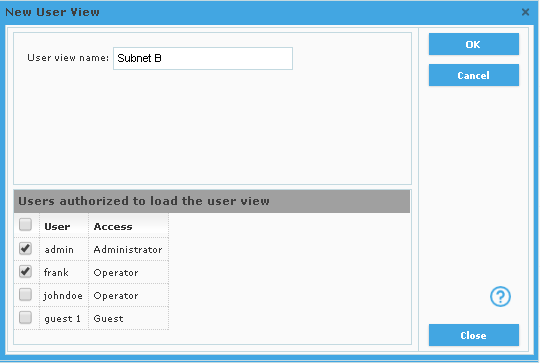
Into the User view name input line in the New/Edit User View dialog box, specify a name for the user view.
In the Users authorized to load user view section, select one or more users by checking their checkboxes. This will assign the given user view to the selected (checked) user(s). Selected users will be allowed to open the user view.
Click the OK button in the upper-right section of the dialog box to apply the changes and close the New/Edit User View dialog box.
Figure: The User Views dialog box, listing the default and a newly configured user view
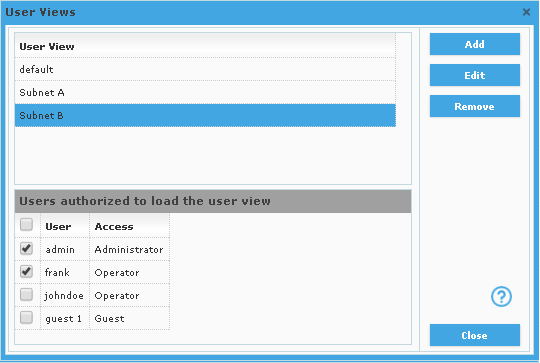
The newly configured user view appears in the User Views dialog box. Click the Close button in the lower-right section of the dialog box to close it.
Authorized users can now switch into the new user view, either by selecting the new user view while logging on to Net Inspector, or by selecting the user view from the User View drop-down list in Net Inspector header section (as shown in the figure below).
Figure: Switching between user views