Administrators may configure parameters that control device polling. These parameters are grouped into two types of profiles:
Access profiles
An access profile contains SNMP, WMI and VMware protocol parameters for accessing monitored devices via the respective protocols (which of the three protocols will be used for monitoring a particular device is determined by the Protocol setting in the polling profile assigned to that device).
Polling profiles
A polling profile contains parameters that control which protocols (e.g., ICMP, SNMP, WMI, VMware, etc.) will be used for polling devices, what categories of parameters will be polled (e.g., interfaces, memory, CPU, disks, etc.) and how often (polling intervals). A polling profile also lets you set thresholds for triggering and clearing alarms and configure alarm delays.
This section describes how to configure and manage access profiles. For instructions on managing polling profiles, refer to the Configuring Polling Profiles topic.
Once a new access profile is created, it can be assigned to a monitored device in the respective Edit Device Monitoring Options dialog box.
Note: Only users with administrator access rights are permitted to configure settings described in this topic.
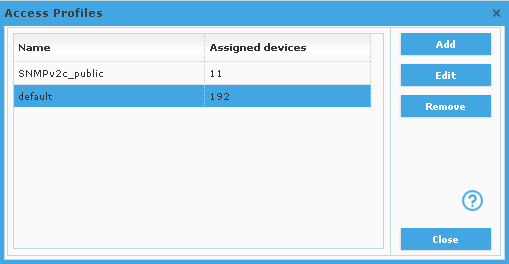
Select the Settings / Access Profiles command to open the Access Profiles dialog box (as shown in the image below).
Figure: Access Profiles dialog box
The Access Profiles dialog box is used for managing access profiles. This dialog box also displays the number of devices that have individual access profiles assigned.
To create a new access profile, click the Add button in the Access Profiles dialog box. This opens the New Access Profile dialog box (as shown in the figure below).
To edit an existing access profile, select it in the Access Profiles dialog box and click the Edit button. This opens the Edit Access Profile dialog box, which has the same appearance as the New Access Profile dialog box.
To delete an existing access profile, select it in the Access Profiles dialog box and click the Remove button. Profiles that are currently in use (=assigned to devices) cannot be deleted.
In the Access Profiles dialog box, click the Add or Edit button, to open the New/Edit Access Profile dialog box (shown below).
Figure: New/Edit Access Profile dialog box, SNMP tab

The New/Edit Access Profile dialog box contains three tabs that let you configure SNMP, WMI and VMware protocol parameters (credentials) for accessing monitored devices via the respective protocols. In this dialog box, you can specify the following settings:
Name (input line)
The name of the access profile. This is a label under which all the settings in this dialog box are saved.
In the SNMP tab, you can configure the Simple Network Management Protocol (SNMP) parameters for accessing SNMP agents running on monitored devices, as follows:
Port (input line)
The UDP port on which SNMP agents on managed devices listen to for incoming SNMP requests.
SNMP version (radio buttons)
The version of SNMP protocol used for querying SNMP agents on managed objects and for receiving SNMP Trap and Inform notification messages sent by those SNMP agents.
SNMPv1
and SNMPv2c:
If SNMPv1 or SNMPv2c protocol version
is selected, specify the SNMP community name (string) to be used:
Community (input line)
The SNMP read community name that will be included into all SNMPv1 or SNMPv2c messages sent by Net Inspector.
SNMPv3:
If the SNMPv3 protocol version is selected, specify the following parameters
that are specific to SNMPv3 USM (User-based Security Model):
Security user name (input line)
The name of the SNMPv3 USM user to be used for exchanging all SNMPv3 messages between Net Inspector and monitored devices (including SNMPv3 Trap and Inform messages sent by devices).
Context name (input line)
The name of the context in which the management information conveyed in SNMPv3 messages is accessed.
Authentication protocol (drop-down list) and Change Password (button)
The drop-down list lets you select the SNMPv3 authentication protocol to be used for authenticating SNMPv3 messages sent on behalf of the given SNMPv3 user. In addition to the standard HMAC-MD5-96 and HMAC-SHA-96 authentication protocols (RFC 3414), Net Inspector supports also the HMAC-SHA-2 authentication protocols for use with SNMPv3 USM, as specified in RFC 7860. These are HMAC-SHA-2-224, HMAC-SHA-2-256, HMAC-SHA-2-384 and HMAC-SHA-2-512. The Change Password button opens a dialog box that lets you enter the authentication protocol password.
Privacy protocol (drop-down list) and Change Password/Key (button)
The drop-down list lets you select the SNMPv3 privacy protocol to be used for encrypting SNMPv3 messages sent on behalf of the given SNMPv3 user. In addition to the standard CBC-DES (RFC 3414) and CFB-AES-128 (RFC 3826) privacy protocols, Net Inspector supports also the CFB-AES-192, CFB-AES-256 and CBC-3DES privacy protocols, which provide stronger security (encryption). The Change Password button opens a dialog box that lets you enter the privacy protocol password.
Note: There is currently no standard for using AES-192, AES-256 and 3DES privacy protocols in SNMPv3 USM. When using these privacy protocols with MD5 and SHA authentication protocols that do not provide long enough output to accommodate the 192- or 256-bit size keys for AES-192 and AES-256 or the 168-bit size key for 3DES, some mechanism needs to be employed to produce localized keys of an adequate size. MG-SOFT Net Inspector uses the key extension mechanism used by Cisco and some other parties, which is described in the Reeder 3DES Internet draft document (https://tools.ietf.org/html/draft-reeder-snmpv3-usm-3desede-00). Note that this mechanism is not employed when using the above privacy protocols with SHA2 authentication protocols that produce the hash output of an adequate size (e.g., SHA2-256, etc.), since no key extension is needed in such case.
Do not localize authentication and privacy keys (checkbox)
If this checkbox is checked, Net Inspector uses non-localized authentication and privacy keys.
Figure: New/Edit Access Profile dialog box, WMI tab
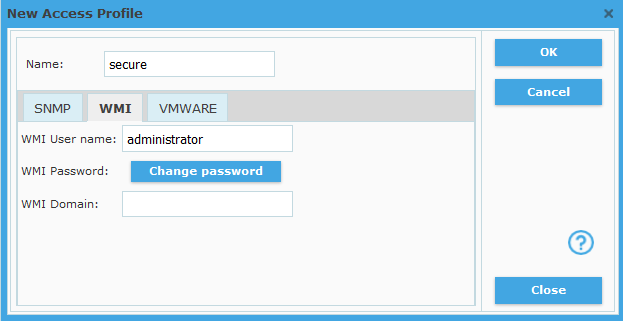
In the WMI tab, you can configure the user credentials used for accessing monitored devices (Windows machines) via the Windows Management Instrumentation (WMI), as follows:
WMI user name (input line)
The user name of the account to be used for WMI monitoring. This user account must exist on the monitored device (Windows computer) and be configured to allow remote WMI monitoring.
WMI password (button)
Click this button to open a dialog box and enter the password of the user account that will be used for WMI monitoring.
WMI domain (input line)
The Windows domain that the WMI user account belongs to (if a domain server is used for authentication).
Figure: New/Edit Access Profile dialog box, VMWARE tab
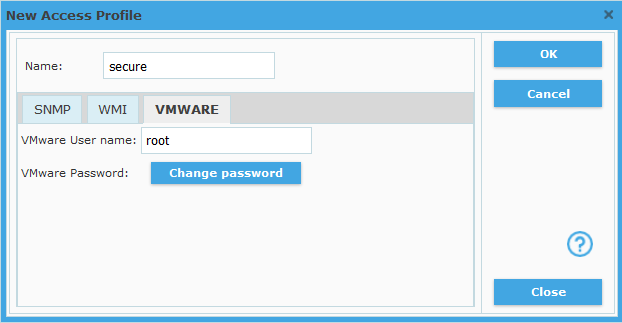
In the VMWARE tab, you can configure the user credentials for accessing VMware servers (ESX(i) or vCenter servers) via the VMware web service (using VMware vSphere API), as follows:
VMWARE user name (input line)
The user name of the account to be used for VMware monitoring. This user account must exist on the monitored device..
VMWARE password (button)
Click this button to open a dialog box and enter the password of the user account that will be used for VMware monitoring.
After you have configured the access profile settings above, click the OK button in the upper-right section of the New/Edit Access Profile dialog box to close it and save all the changes.
If you have created a new access profile, its name appears in the Access Profiles dialog box. Click the Close button in the lower-right section of Access Profiles dialog box to close it.
Tip 1: Once you have configured a new access profile, you can assign it to a monitored device in the Edit Device Monitoring Options dialog box, in the Access profile drop-down list.
Tip
2: To
quickly assign a access profile to two or more devices, select the
devices in the Devices page (Map View
frame), and click
the Edit
Device button (![]() )
in the Map View frame toolbar. This opens the Edit Device Monitoring
Options dialog box.
Select the desired access profile from the Access
profile
drop-down list and click the
OK button to apply
the change for all selected devices.
)
in the Map View frame toolbar. This opens the Edit Device Monitoring
Options dialog box.
Select the desired access profile from the Access
profile
drop-down list and click the
OK button to apply
the change for all selected devices.