This topic describes how to add devices from the Device Panel to (sub)maps. Device Panel is a container available in the Map View Configuration Mode. Device Panel contains all devices that exist in Net Inspector.
When you create a new device in Net Inspector and add it to a map, this device is also added to the Device Panel (this applies to all methods of adding devices to Net Inspector). You can then add this device from the Device Panel to other maps and user views, as described below.
If devices do not exist in Net Inspector yet, you can add them in several ways (e.g, via the network discovery, virtualization discovery, manually, etc.), as described in the Adding Devices to Net Inspector topic.
Note: Only users with administrator access rights are permitted to add devices to (sub)maps.
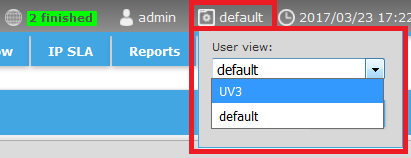
From the User view drop-down list in the upper-right section of the Net Inspector header, select the user view you wish to add devices to (see the figure below).
Figure: Selecting the user view
Click the Devices tab in Net Inspector header to display the Devices page.
In the upper-right section of the Devices frame, click the Configure button (as shown in the figure below) to enter the Configuration Mode.
Figure: Clicking the Configure button
![]()
In the Explorer section on the left side of the Map View frame, click the map (e.g., the root map or any other map), which you would like to add devices to.
Figure: Selecting a map to add devices to (in Map View Configuration Mode)
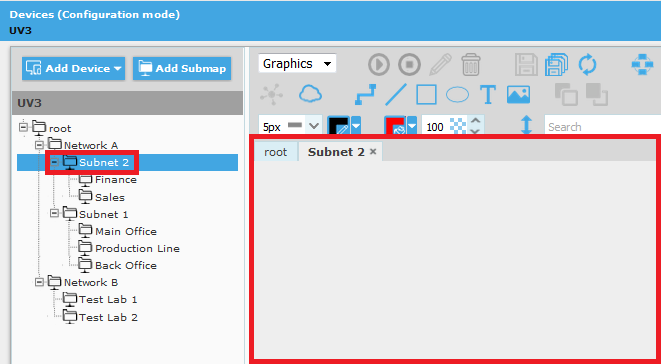
A new tab appears in the middle section of the Map View frame, displaying the contents of the (sub)map selected in the left section (as shown in the figure above).
The Device Panel displayed on the right-hand side of the Map View frame (Configuration Mode) contains a list of all devices in the system.
Figure: Adding devices from Device Panel to a map
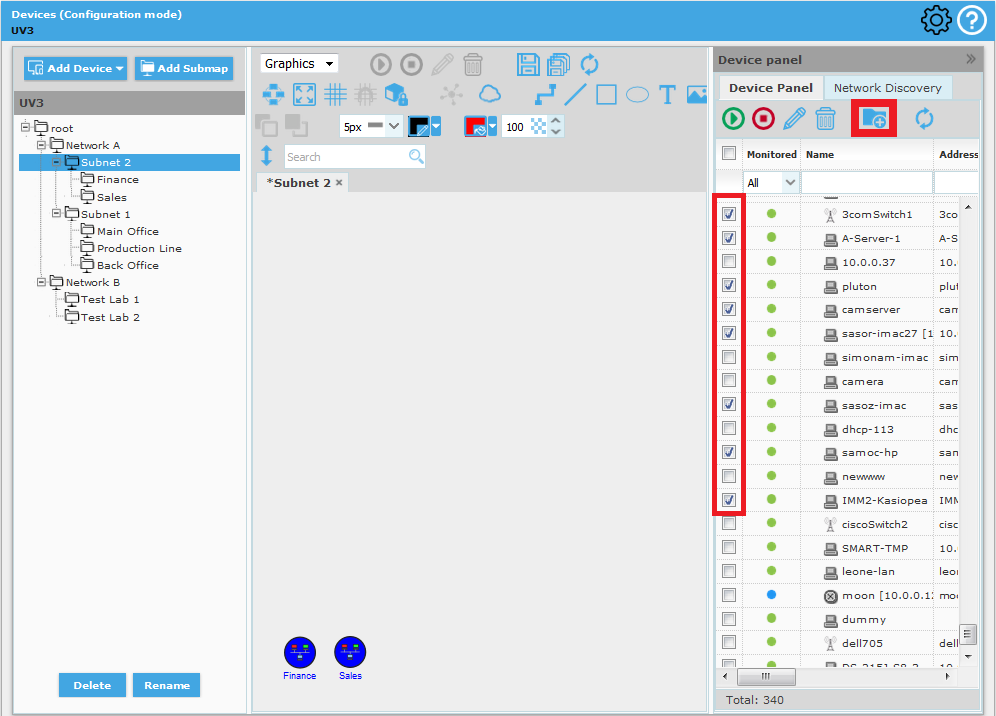
Select the devices
you wish to add by checking their checkboxes in the Device
Panel and click the Add
to Map button ( )
in the Device Panel toolbar (see the image above).
)
in the Device Panel toolbar (see the image above).
Figure: Devices are added to the map
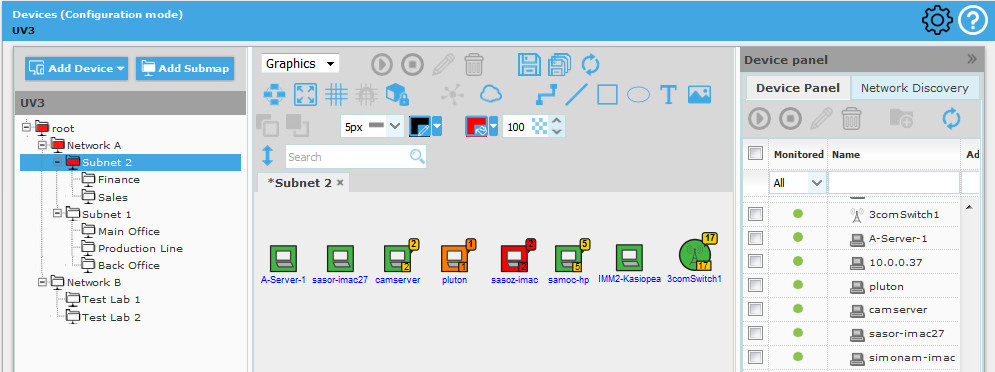
The selected devices appear on the map - as shown in the middle section of the Map View frame in the figure above. Device icons reflect colors that indicate the status of devices. Notice that the status color of the most critical device on the map (e.g., red) is reflected also on the map in the Explorer section on the left side of the Map View frame (and the most critical status color is propagated all the way up to the root map in Explorer).
Optionally, you can manipulate devices on the map and edit the map layout, as follows:
Reposition devices on the map by moving their icons with mouse.
Connect devices with connection lines.
Manually create and add new devices to the map (and to Net Inspector).
Remove
devices from the map by selecting them with the mouse and clicking
the Remove
button ( ) in the Graphics
toolbar. Note that this will not
delete device from the Device Panel!
) in the Graphics
toolbar. Note that this will not
delete device from the Device Panel!
Add graphic elements (e.g., rectangles, ellipses, lines, bitmap images, etc.), cloud objects and text to the map by using the Graphics toolbar.
Disable
or enable device monitoring by selecting devices and clicking the
corresponding toolbar buttons ( ,
,
 ), etc.
When
you have finished adding and manipulating devices on the map, click
the Save Map
Layout
button ( )
in the Graphics
toolbar
in the Map View frame to save the changes.
)
in the Graphics
toolbar
in the Map View frame to save the changes.
By repeating the above procedure, you can add devices to other (sub)maps.
When
finished, click the Configure
toggle button (![]() )
in the upper-right section of the Devices frame (figure)
to exit the Configuration Mode.
)
in the upper-right section of the Devices frame (figure)
to exit the Configuration Mode.
Devices and their connections can also be added to maps from Discovery Panel, as described in the Adding Devices by Using Network Discovery topic.